Author Archives: admin

Chocolate Raspberry Coconut Layer Bars

14 May 15
admin
, , , , ,
No Comments

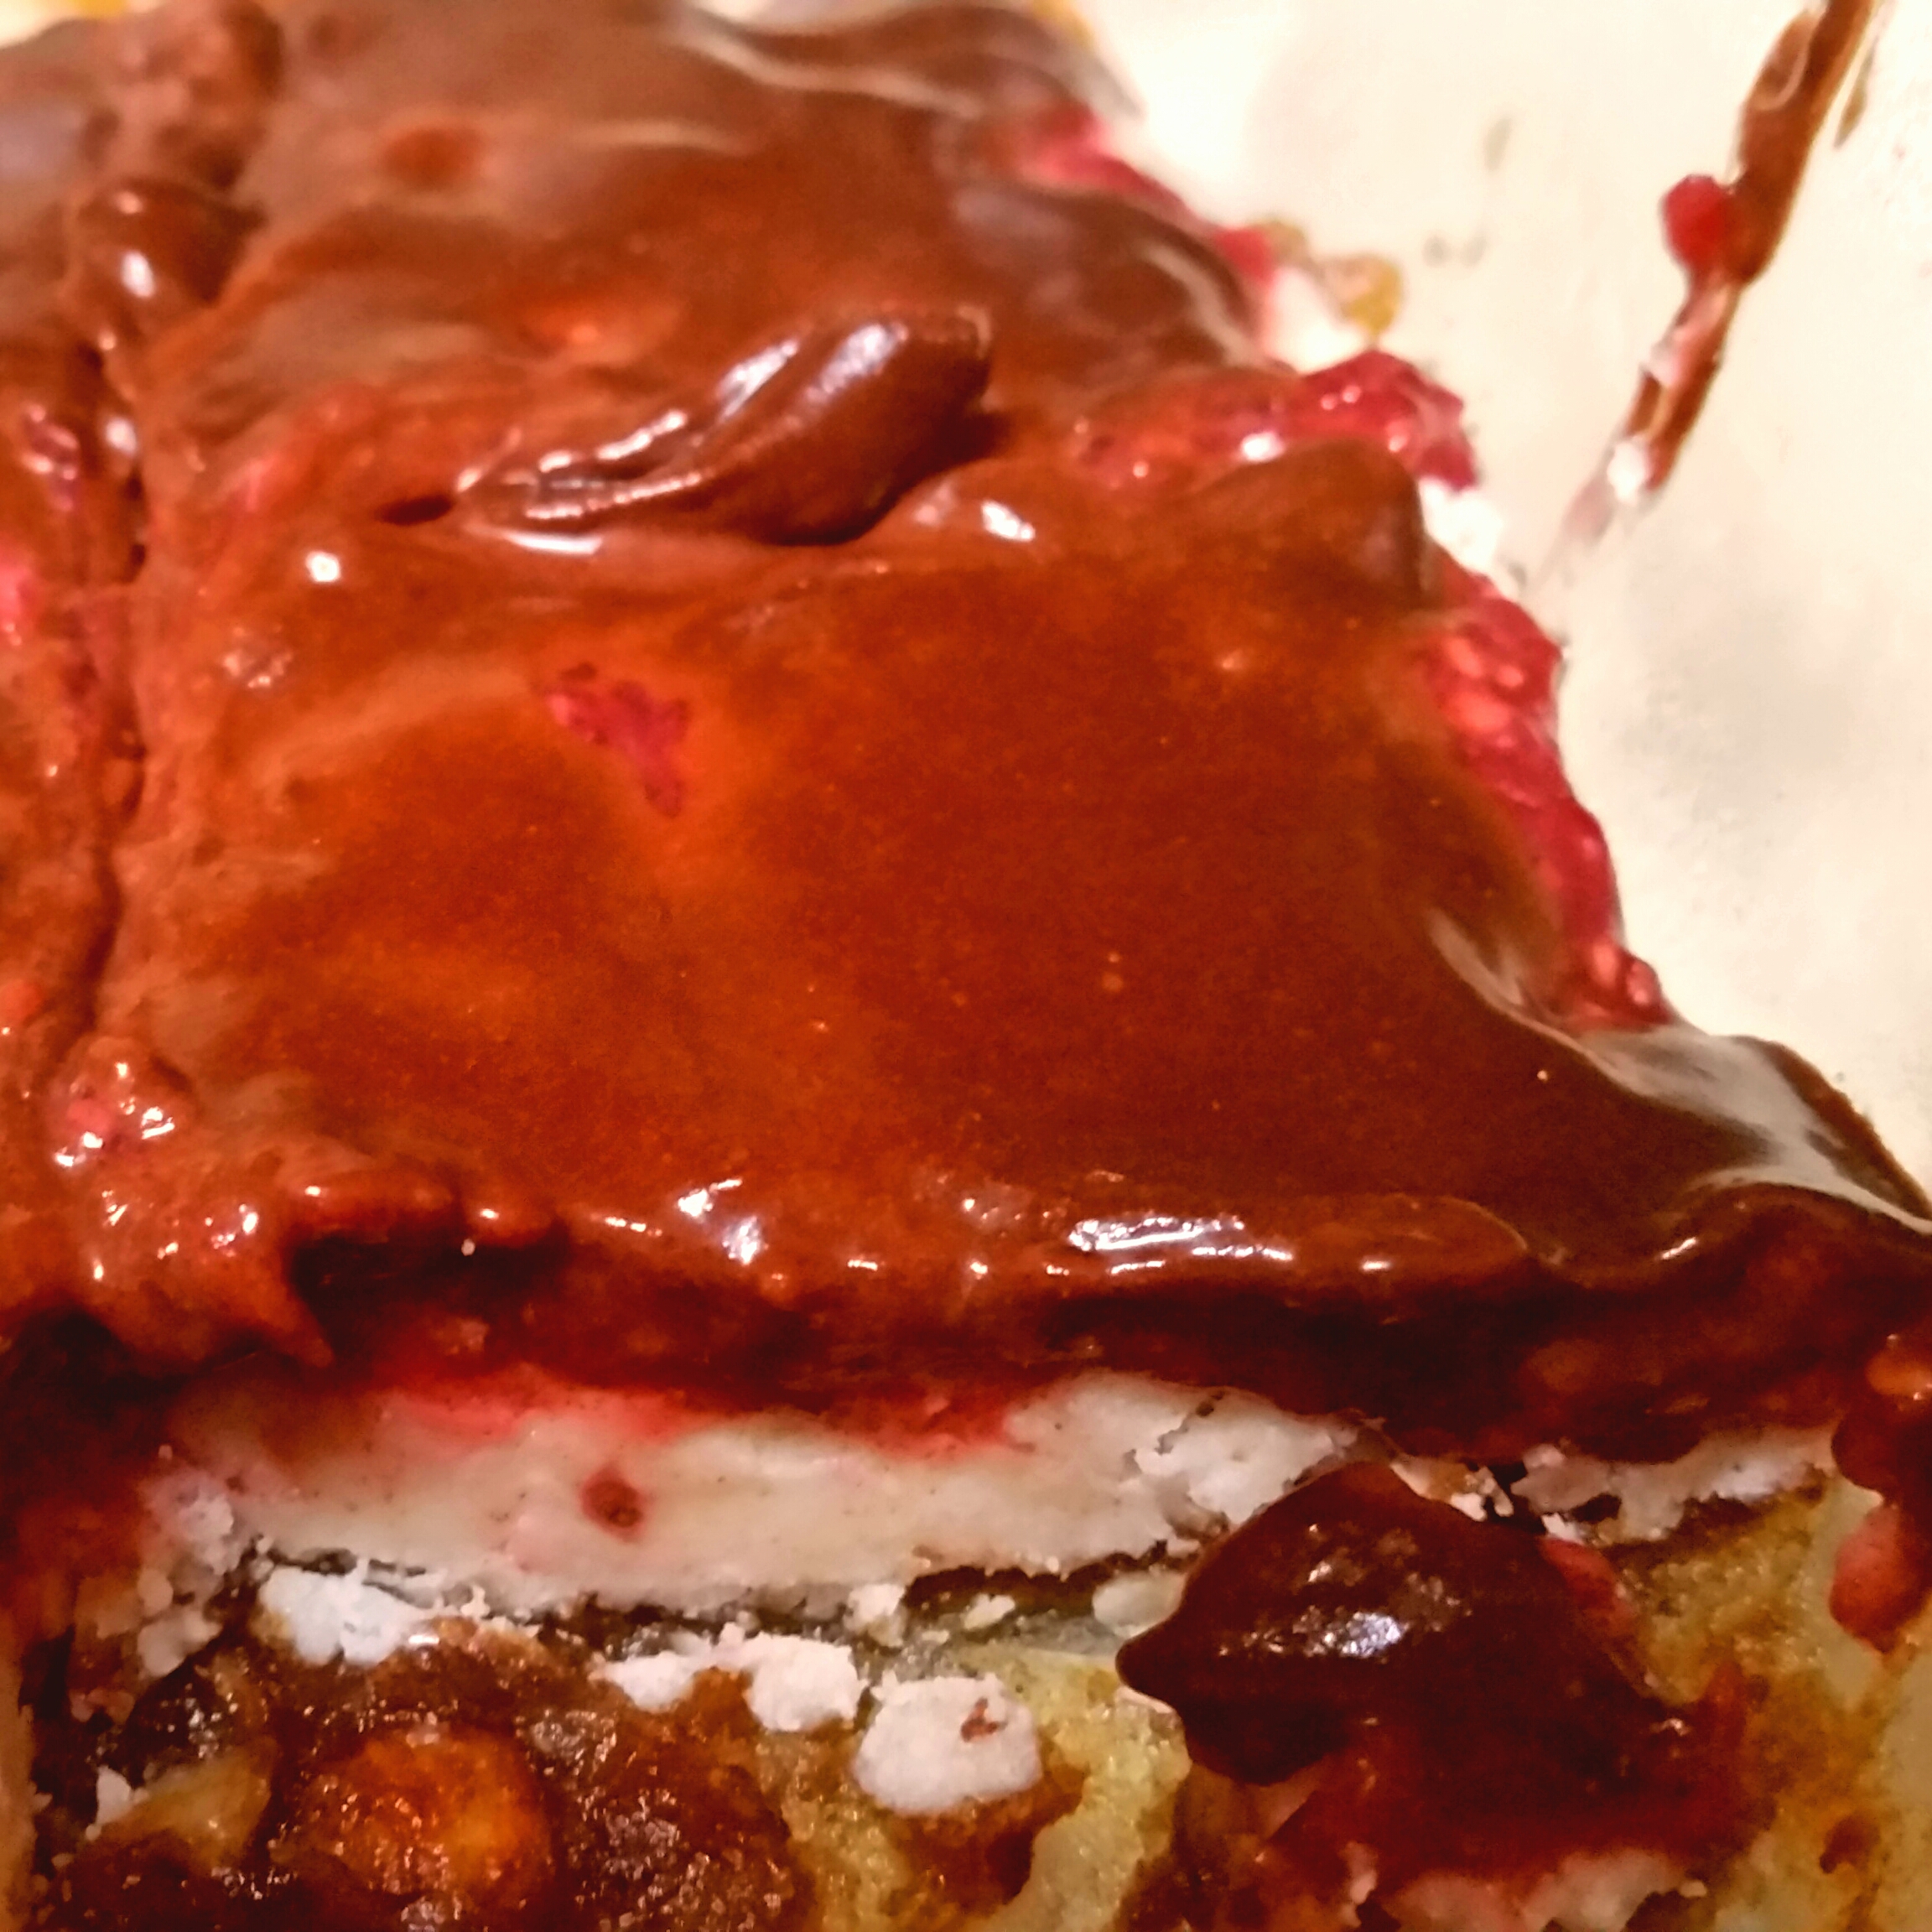
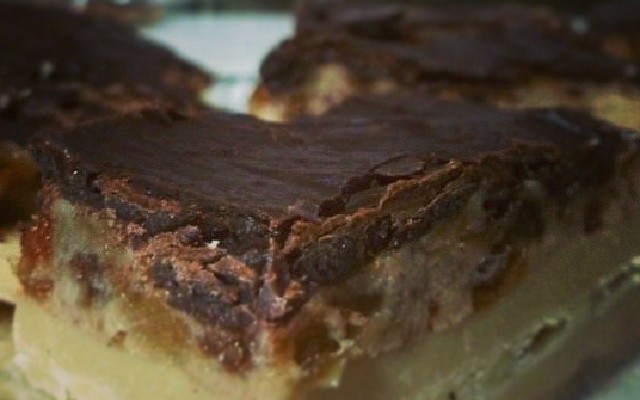
Ooey gooey chocolate mixed with raspberry jam???  Where can I get some?!?  Well, try these raw vegan, gluten free chocolate raspberry coconut layer bars to satisfy your cravings!  They’re easy to make and delicious!  You have a caramel-like bottom layer, then a coconut cream layer, then raspberry jam, followed by chocolate on top, to create a wonderful mesh of flavors!  This recipe calls for melted coconut oil – do not microwave the oil to melt it.  That will kill the nutrients.  Coconut oil’s melting point is only 76 degrees, so put the oil in a small container over a container of steaming hot water.

choco raspberry coco bars


Bottom Layer Ingredients:

  • 10 hazelnuts, soaked for at least 8 hours and drained
  • 5 large medjool dates
  • 1 tsp raw honey (or maple syrup to make it vegan)
  • 1 tsp raw cacao powder

Coconut Layer Ingredients:

  • 1 cup raw coconut butter
  • 1 tsp coconut oil, melted (see above)
  • 1 tsp raw honey (or maple syrup to make it vegan)
  • 1 tsp almond extract

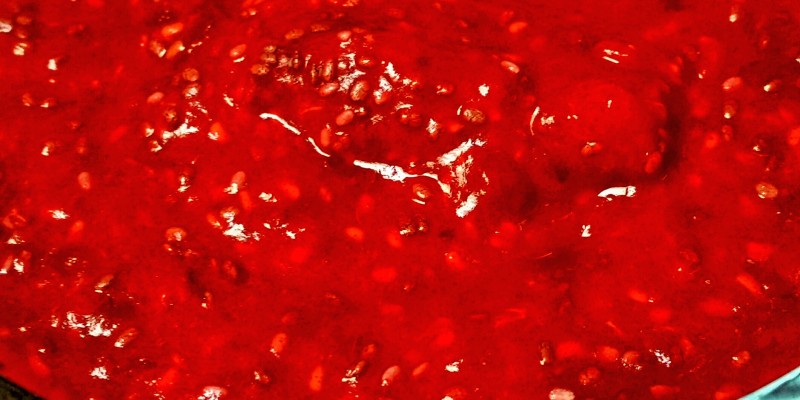
1 cup Raspberry Jam: Click for recipe – make at least 2 hours ahead of time.

Chocolate Layer Ingredients:

  • 1/4 cup raw cacao powder
  • 1 tbsp maple syrup
  • 1 tbsp vanilla extract
  • 1 tsp coconut oil, melted (see above)
  1. Blend bottom layer ingredients in a food processor or blender.  Spread along the bottom of a glass pan.
  2. Blend coconut layer ingredients in a food processor or blender and spread on top of the bottom layer.
  3. Layer raspberry jam on top.
  4. Blend chocolate layer ingredients in a food processor blender and pour over the top.
  5. Freeze for an hour to set.  Cut into rectangles and then leave in the refrigerator.

Raspberry Jam

14 May 15
admin
, , , ,
No Comments

Raw vegan raspberry jam – what more is there to say?  This is super simple to make, and delicious!  I love having different ways of eating fruit!  So the next time you want jam, make your own!


Makes 3-4 cups.

Ingredients:

  • 1 cup fresh raspberries
  • 4 large medjool dates
  • 1/8 cup coconut water
  • 1 tbsp chia seeds
  1. Blend dates with water, then add raspberries.
  2. Stir in chia seeds.
  3. Refrigerate for at least 2 hours.

Vietnamese Mung Bean Dessert (Chè)

16 Apr 15
admin
, , , ,
one comments

One of the great things about having a mother who cooks great food is easy access to such deliciousness.  Not only can I pick her brain on how to make the food, but I know how it tastes, too, so I can play around with ingredients to healthify them!

Ché is a term used to describe a large variety of Vietnamese desserts.  There isn’t really a way to pin them down, except that they all seem to contain liquid as well as food.  They are all vegan, but some are only eaten cold, some are only eaten hot, and some can be eaten both ways.  This can be eaten both ways, and I enjoy it both ways but I think I may slightly prefer eating it cold.  Don’t worry about measurements for this – adjust it to your tastes and preferences.  I have yet to figure out a healthy way to recreate my favorite ché, but here is a super simple version of one that my mom made for me over the holidays that I couldn’t stop gobbling.  It is so easy to make that you can basically let it sit while you go watch TV or do other things.  It has a sweet and nutty taste to it from the mung beans, in a creamy base from the coconut milk.  This dessert is gluten free and high in omega-3 fatty acids, protein, and fiber.

If you are having trouble finding any of these ingredients, just click on the ingredient and you’ll be taken to the Amazon.com link for the item.

Makes 4 cups

Ingredients:

  1. Add chia seeds to a large container.
  2. Shake the can of coconut milk until the liquids and solids mix together and add milk and syrup to the container.  Don’t worry if you have chunks of coconut milk – they will melt later.  Stir ingredients until they turn into a light brown color.
  3. Rinse mung beans and add to a large pot.  The beans should be a thin layer across the bottom.  Add enough water so that it rises above the layer by about half an inch.  You can add more if you want the beans to become softer and thicker.
  4. Heat beans on medium low until they simmer. Reduce heat to low until most of the water is absorbed into the beans and the beans have softened, about 30-40 minutes, stirring once or twice.  There should be no more water rising above the layer of beans.  You can always adjust the water and amount of mung beans to your taste, or let it heat longer if you want the beans even softer.
  5. Add beans and remaining water from the pot into the container and stir until the solid chunks liquefy and blend with the rest of the dessert.
  6. Serve immediately or refrigerate for at least a few hours and serve cold.

Tip:  If you want to serve it immediately, I recommend letting the chia seeds soak in the milk mixture for at least a couple hours before starting the mung beans, so that the chia seeds can have time to form that gel coating.


PART_1429193117937_2015-04-16_09.34.06


Vietnamese Sandwich (Bánh Mì) Deconstructed

14 Mar 15
admin
No Comments

I love bánh mì but I usually only eat it when I splurge, since it typically involves a white baguette and mayonnaise and/or butter.  It’s a result of when the French had taken over the country, and represents a fusion of the two cultures.  Well, now you can enjoy the taste in a much healthier way.  It’s vegan with sprouted bread, and can be made raw vegan by omitting the bread.  It’s also gluten free if you omit the bread and use tamari soy sauce.  So get ready for this wonderful blend of flavors!

If you don’t know what daikon is, it looks like a large white carrot, maybe about 3x the size of a normal carrot.  If you don’t have access to daikon, you can try using radish slices instead.

P1010109

Ingredients:

  • 1 package tempeh, chopped into inch-long medium-thin slices
  • 2 tbsp nama shoyu (or tamari for gluten free option)
  • 1 tbsp fresh squeezed lime juice
  • 2 tbsp maple syrup, plus 1/3 cup
  • 1 small garlic clove, minced
  • 1-2 scallions, chopped
  • crushed red pepper flakes, to your taste
  • 1/3 cup filtered water
  • 1/3 cup brown rice vinegar
  • 1/3 cup maple syrup
  • 3/4 cup shredded carrots
  • 3/4 cup shredded daikon
  • 4 cups shredded romaine lettuce
  • 1/2 cup chopped cilantro
  • 2 slices sprouted bread, toasted and chopped (omit for raw vegan and gluten free option)
  1. Toss tempeh with the nama shoyu, lime juice, 2 tbsp maple syrup, garlic, scallions, and pepper flakes and let marinate in a plastic bag.
  2. In a jar, combine water, vinegar, 1/3 cup maple syrup, carrots, and daikon.  Let sit for at least 2 hours, but the longer the better.  This should last for a very long time, even months.  Make sure the liquid covers the vegetables.  If you want to add more carrots and daikon, just make sure you keep a 1:1:1 ratio of water to vinegar to syrup.
  3. To serve, toss together lettuce, cilantro, bread, and tempeh, and then add carrots and daikon to your liking.  Make sure that you lightly squeeze out most of the liquid from the carrots and daikon as you add them to your dish.

P1010108


Chocolate Caramel Bars

13 Mar 15
admin
No Comments

Enjoy a tasty chocolatey, gooey treat without any of the guilt!  I have to admit, I have trouble enjoying the bitter taste of raw cacao, but I have no trouble scarfing these down.  So instead of grabbing those candy bars, reach for raw vegan candy bars, instead!  If you like Twix, I have a feeling you’ll like this, and they’re super easy to make!


Bottom Layer Ingredients:

Caramel Layer Ingredients:

  • 3/4 cup medjool dates (about 9 dates)
  • 2 tbsp raw cashew butter
  • 1/4 cup filtered water
  • pinch sea salt

Chocolate Layer Ingredients:

  1. Mix bottom layer ingredients in a bowl.
  2. Layer down onto parchment-lined baking sheet and place in freezer.
  3. Add caramel layer ingredients in a blender or food processor and spread on top of the bottom layer and return to freezer.
  4. In a small food processor or blender, blend chocolate layer ingredients and place a thin layer over the top.
  5. Leave in freezer until ready to cut and serve!


Potato Salad

12 Mar 15
admin
No Comments

Traditional potato salad is typically very unhealthy.  Lots of carbs and fat, no nutrients.  Well, now you can enjoy the taste without any of the guilt, and with plenty of nutrition added as a bonus!  For this recipe, I incorporated a raw vegan mayonnaise recipe I found from The Rawtarian.  Most of this recipe is raw vegan – the only exception are the potatoes.


Ingredients:

  • 6 medium potatoes, largely chopped (I used 3 sweet potatoes and 3 white potatoes)
  • 1 1/2 cups mayonnaise (click for recipe – MUST use raw vegan mayonnaise, otherwise this recipe is NOT healthy)
  • 1 tbsp apple cider vinegar
  • 1 tbsp Dijon mustard
  • 1 tsp sea salt
  • 1/2 tsp black pepper
  • 2 medium celery stalks, diced
  • 1 medium Vidalia onion, diced
  • 1 medium to large carrot, diced
  1. Set a steamer basket in a large pot, and add enough salted water to come just below basket.  Bring to a boil.
  2. Place potatoes in basket, cover pot, and reduce heat to a gentle simmer. Steam potatoes, gently tossing occasionally, until tender, about 30-40 minutes.
  3. Meanwhile, mix mayonnaise, vinegar, mustard, salt, and pepper in a bowl.
  4. Add potatoes and remaining ingredients and stir well.  Refrigerate until cold.


Pad Thai

08 Mar 15
admin
No Comments

I did it! I finally did it! I finally worked out a vegan recipe that adequately mimics the taste of pad Thai!  This can be made gluten free by using tamari instead of nama shoyu and it can also be made raw vegan by using kelp noodles instead of the rice noodles.  However, I do not know how much kelp you’ll need but it’ll have to be at least the larger bag that is sold in stores.  Kelp noodles are sold in the refrigerated area and to prepare kelp noodles, simply rinse the noodles.  I would also suggest cutting the noodles a bit to make them easier to grab and eat.

Healthy, vegan pad Thai was difficult for me to work around because Asian dishes have complex flavors, and two of the most prominent ingredients in traditional pad Thai are fish sauce and sugar.  So, after many disappointments, I am excited to present to you my pad Thai!  Although, one of the experiments did lead to the peanut noodle/pad Thai fusion that is also an excellent dish, which I highly recommend you trying by clicking here.

Sauce Ingredients:

Main Dish Ingredients

  • 1 16-ounce bag frozen broccoli
  • 1 package tempeh, chopped thinly into 1″ long blocks
  • 1-2 tablespoons sesame oil
  • 1 box brown rice noodles (or kelp noodles for raw vegan)
  • 1 red bell pepper, sliced into 1.5″ long thin strips
  • 3 scallions, chopped
  • 4-6 cloves garlic, minced
  • cilantro for garnish (optional)
  • lime wedges for garnish (optional)
  • mung beans for garnish (optional)
  1. Turn on oven to lowest temperature (ignore if making the raw vegan version).
  2. Throw all sauce ingredients into the food processor or blender.  I suggest blending the garlic, tomatoes, and oil first before adding the rest.  Set aside.
  3. Let the broccoli thaw out.
  4. Place tempeh flat on a baking sheet and spread a thin layer of sesame oil over the top.  Place in oven while making the rest of the dish (about 30-40 minutes).  For the raw vegan version, just let the tempeh marinate in the sesame oil and serve as is.
  5. Boil water, then let it cool for 5 minutes.  Pour water into a large pot and add noodles, bell pepper, scallions, and garlic.  Let sit for 20 minutes.  For the raw vegan version, let the vegetables sit in hot, but not boiling, water for 20 minutes and then mix with the kelp noodles.
  6. Drain the noodles and vegetables and stir in the broccoli, tempeh, and sauce until thoroughly coated.
  7. Serve with garnishes!


Drunken Noodles

23 Feb 15
admin
No Comments

I love Thai food, so of course I had to take a stab at another dish that I love – drunken noodles!  Sometimes it also goes by the name of pad see ew.  So of course I had to take a stab at vegan drunken noodles/vegan pad see ew.  I healthified even further by replacing some of the ingredients for more wholesome items.  Like all my other recipes, this has a ton of nutritional benefits.  I loved this dish and could not stop myself from getting more, even though I wasn’t even hungry!  But what I love is that there is no guilt when eating these foods.  Try it and see!


Serves 4.


Ingredients:

  1. Whisk together vinegar, nama shoyu or tamari, maple syrup, lime juice, miso, and red pepper flakes and set aside.
  2. Boil hot water for the noodles, then pour boiled water into separate pot and let sit for 5 minutes.  Add rice noodles and let sit for 20 minutes, then rinse in cold water.
  3. While noodles are cooking, heat oil in wok or large skillet on low to medium-low heat, then add garlic, onion, and tempeh, cooking until the tempeh gets a light brown color.
  4. Add carrots and bell peppers, cooking until carrots lightly soften up.
  5. Stir in noodles and sauce until everything is coated.
  6. Add tomatoes and stir for about a minute or two.

1546228_10102261147010218_263358096927908563_n


Thai Curry Sauce

11 Jan 15
admin
, , ,
No Comments

Yum, who wants some delicious vegan, gluten free Thai curry?  Bursting in flavor, this sauce is very versatile and so easy to make!  I have eaten it with quinoa and with noodles. Of course, you can also go the traditional route and eat it with rice.  This makes quite a bit of sauce, so it is enough for several servings.  And as long as you know how to chop and stir, you should be able to make this dish!  Be careful, because once you start eating it, you might find it hard to stop!  This recipe is made without curry powder or paste, since I don’t have any on hand and am reluctant to go buy something that can only be used for one type of dish.


curryIngredients:

  • 1 1/2 tbsp olive oil
  • 1 medium red onion, 1/2 thinly chopped and 1/2 thickly chopped
  • 2 tbsp fresh ginger, minced
  • 4 garlic cloves, minced
  • 1/4 cup raw creamy almond butter
  • 2 tsp turmeric
  • 1 tsp ground cumin
  • 1 cup water
  • 1 can full fat coconut milk
  • 3 tbsp lime juice and their zest (about 1 1/2 tsp)
  • 1 tbsp maple syrup (optional)
  • crushed red peppers, to your taste
  • 1 package tempeh
  • 3 medium carrots, sliced into 1/4″ thin strips
  • 1 red bell pepper, sliced into 3/4″ long thin strips
  • 1 potato, largely chopped (optional)


  1. Heat oil in large skillet or wok over medium-low heat and add thinly chopped onion, ginger, and garlic, cooking until tender (about 10 minutes).
    P1010023
  2. Add almond butter, turmeric, and cumin and stir for a few minutes.
  3. Whisk in water, coconut milk, lime juice and zest, maple syrup, and red peppers, and bring to simmer.  Season with salt.
    P1010025
  4. Add thickly chopped onion, carrots, and bell pepper, simmering over medium-low heat and stirring occasionally until carrots are tender, about half an hour.  Season with salt.  If you are adding potatoes, you may want to add a little more water so that there is enough curry to coat all the vegetables.
    P1010027


And there you have it!  I served mine with quinoa – delicious!P1010033


Crow – The Gateway Arm Balance

01 Jan 15
admin
,
No Comments

Arm Balances

Arm balances look intimidating.  They feel intimidating.  But they’re fun, trust me!  Crow pose is what I like to call the gateway arm balance pose.  Once you figure your way out of crow pose, you understand arm balances much better, and the more advance arm balances become easier to work your way around.  The reason crow pose is the best way to start getting into arm balances is because the distribution of your weight is condensed into a small, compact area, so it makes it easier to determine your balance.  So here are a few tips:

  1. Understand that it’s not so much a matter of arm strength or balance, but of learning how to distribute your weight.
  2. The closer your get your knees to your arm pits, the easier it’ll be.  Positioning your knees outside your arms and pushing into your arms while keeping your arms engaged will help you maintain stability.
  3. Getting into this pose doesn’t involve lifting up, but leaning forward into your hands until your feet lift off.  Then tuck your feet in if you can.
  4. Most people look down at the floor – try to look more forward.  Looking at the floor is a good way to find yourself there.
  5. Engage your pelvic muscles for more stability.
  6. BREATHE!

And that’s it!  Hopefully these tips will help you get into this fun and simple pose!

IMG_2988

Previous Yoga Post – Standing Bow Tips

Next Yoga Post – Why Go Upside Down?