Tag Archives: vegan

Eggplant Parmesan

01 Nov 14
admin
, ,
No Comments

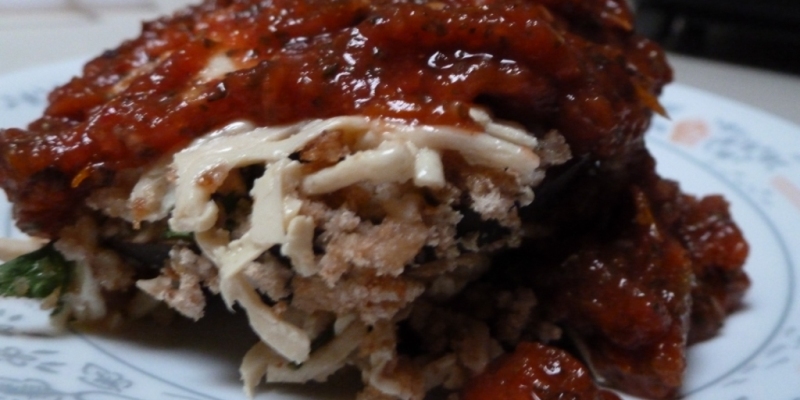
I love eggplant parmesan.  But when I indulge in some cheesy, saucy goodness, I have to prepare myself for the repercussions of eating a completely unhealthy meal…what with the deeply fried eggplant dipped in batter and covered in breadcrumbs, then the mounds of cheese, and finally the cooked tomato sauce (cooked tomatoes are acidic on the body – raw tomatoes are alkalizing).


So now I have this lightly baked vegan eggplant parmesan dish that’s loaded with nutrients and baked!  I’m very pleased with myself.  I love finding guilt-free versions of unhealthy food.  So let’s begin, shall we?


Eggplant Ingredients:

Sauce Ingredients

  • 2 medjool dates, pitted
  • 1 clove garlic
  • 1/2 cup sun dried tomatoes, soaked at least 1 hour (or at least 10 minutes in hot water)
  • 1 1/2 tbsp apple cider vinegar
  • 1/4 cup dried basil
  • 1/3 tsp dried oregano
  • 1/3 tsp dried rosemary
  • 1/3 tsp dried thyme
  • 3 medium tomatoes (about 1.5-2 cups)

Directions:

  1. Preheat oven to 225º.  Line a baking sheet with aluminum foil.
  2. Lay the sliced eggplant on a paper towel and coat with sea salt (about 1/4  -1/2 tsp per slice).  Let sit for 30 minutes.
  3. Toast the bread, then toss into food processor with nutritional yeast and parsley.  Set aside.
  4. Grind the oats to make flour and set aside.
  5. Drain almonds and put in food processor with water.  Strain through nut milk bag or cheesecloth to make 1 cup almond milk.
  6. Combine oat flour, almond milk, apple cider vinegar, and remaining seasonings in food processor and set aside.
  7. Rinse the salt off the eggplant and pat dry with paper towels.  Dip the eggplant in batter and then coat both sides with breadcrumb mixture, and place on baking sheet.P1000990
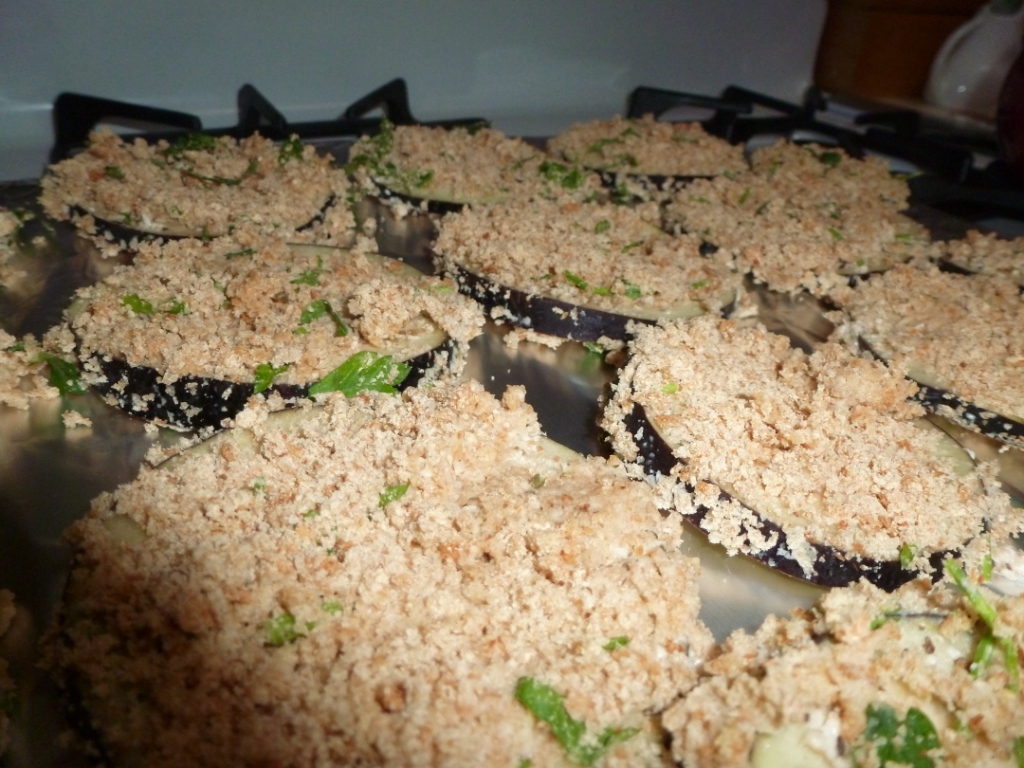
  8. Top eggplants with Daiya cheese and place in oven for 15 minutes.  Flip and bake for another 20 minutes.P1000995
  9. While the eggplants are baking, combine sauce ingredients into food processor.  It may help to process the dates and garlic first, then the sun dried tomatoes, then the rest of the ingredients.
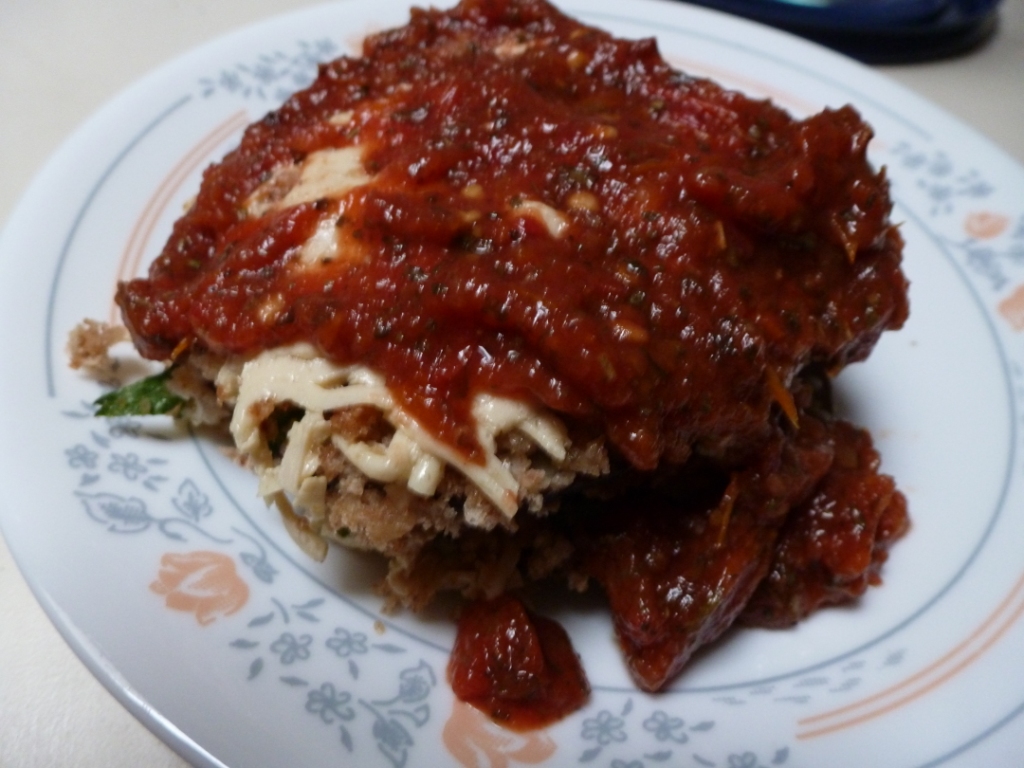
  10. Serve eggplants with healthy dollop of sauce.  Store eggplants separately from sauce.  I recommend not using the microwave to reheat, but instead the oven.

P1010001


Pancake Cinnamon Rolls

25 Oct 14
admin
, , , ,
No Comments

Oh My Deliciousness!!  This is so amazing, you’d have a hard time believing it’s whole and nutritious!  Gently cooked vegan, gluten free pancake cinnamon rolls – now you can have your guilty pleasure breakfast food without the guilt!  I LOVE it when food not only bursts with flavor in your mouth BUT your body also gets to reap the benefits of the nutrients.  I didn’t bother cleaning my blender between uses, aside from a quick rinse.  For those of you who are against using raw honey, you can replace it with maple syrup but the taste will be significantly different.


Ingredients to be done first:

  • 3/4 cup raw almonds, soaked at least 1 hour (preferably overnight)
  • 1 1/2 cup filtered water

Batter Ingredients:

Filling Ingredients:

  • 1/2 cup raisins
  • 3 tbsp raw honey (I use the solid kind, so if you prefer the liquid kind, I do not know how runny the result will be)
  • 2 tsp cinnamon
  • pinch sea salt

Icing Ingredients:

Directions:

  1. Drain almonds and blend with water.  Strain through a nut milk bag and set aside liquid.  This is your almond milk.
  2. Preheat oven to 225º and heat a little coconut oil on a large pan on low heat.
  3. Grind oats, then add baking powder, sea salt, cinnamon and nutmeg and blend.  Set aside.
  4. Add remaining batter ingredients plus 1/2 cup of the almond milk to blender or food processor and blend.
  5. Add dry ingredients to wet ingredients in blender and blend.
  6. Pour half the batter onto the pan and cook it on medium low until bubbles start popping and the bottom of the batter becomes light to medium brown in color.  You want to spread out the pancake wide and fairly thin.P1000976
  7. Flip batter and cook on the other side for a few minutes, leaving it mostly undercooked.
  8. Repeat with the rest of the batter, making 2 large pancakes.
  9. Meanwhile, blend the filling ingredients until it is fairly smooth.
  10. Spread the filling mixture evenly onto both pancakes, stopping about half an inch from the edges.2014-10-25_14.35.27
  11. Roll the pancakes and cut the roll about 2″ apart, making 2″ high cinnamon rolls.2014-10-25_14.36.47
  12. Place the rolls back onto the pan and put the pan into the oven for about 10 minutes.2014-10-25_14.51.36
  13. While that is cooking, melt coconut butter.  An easy way to do this is to place coconut butter in a shallow cup or bowl, and place the cup or bowl inside a larger bowl filled with very hot water.  If you stir constantly, the coconut butter should melt within a couple minutes.
  14. Blend melted coconut butter with the remainder of the ingredients and 1.5-2 tbsp of the almond milk.  If you have any leftover almond milk and feel uneasy about throwing it out, add a little bit of vanilla extract and maple syrup and enjoy a small beverage!
  15. Once the rolls are done baking, remove and drizzle icing over the rolls for some soft, gooey deliciousness!


Veggie Quinoa Bowl with “Peanut” Lime Sauce

20 Sep 14
admin
, , , ,
No Comments

I’ve never been one for salads, but I think this is semi-salad.  It has a fresh taste to it.  The vegetables are barely cooked and the lime adds a fresh, almost dressing-like flavor to the sauce.  Very easy to make and of course it’s delicious.  It is very close to raw vegan, the only thing is that the quinoa is cooked and the vegetables are VERY slightly cooked.  But all you’d have to do to make it vegan is to replace the quinoa with raw noodles instead, like kelp or zucchini noodles.  I like more starch-like flavor in my food, I guess.  Plus, it’s gluten free!


Ingredients:

  1. Cook quinoa according to directions.
  2. Meanwhile, add ginger and garlic to a food processor or blender and blend.  Then add almond butter, tamari, lime juice, maple syrup, and water.  Sprinkle with sesame seeds, if desired.P1000916
  3. Once quinoa is finished, turn off heat and stir in remaining vegetables, until the bok choy leaves become a little wilted.P1000915
  4. And that’s it!  Serve cold.  To serve, drizzle desired amount of sauce over the quinoa.  Otherwise, keep them separated.  Enjoy!

P1000918


Pineapple Mango Sorbet

01 Aug 14
admin
, , , ,
3 comments

So easy and so quick to make, and a great way to get some potassium, zinc, iron, and manganese, not to mention vitamins A, B, C, and E!  This raw vegan, gluten free delight is my favorite way to eat fruit!  You can use other fruits, of course, instead of mango and pineapple, but the banana is necessary to sweeten it.  I find that raspberries result in a slightly unpleasant texture due to the seeds.  The easiest way to make this is to use a juicer with a homogenizer attachment, which should be found with most single and twin gear juicers.  I’ll provide a recipe for use with a blender but I cannot entirely vouch for it, and it may result in more of a soft serve than a sorbet.


Ingredients:

  • 1 frozen ripened banana
  • 1/2 package frozen pineapple
  • 1/2 package frozen mango

Juicer Method

  1. Break up the banana into 6 pieces.
  2. Put through juicer using homogenizer attachment, alternating fruits.  I put a couple pieces of pineapple, followed by a piece of banana, and then a couple pieces of mango.

Blender Method

  1. Let banana sit out at room temperature for about 10 minutes.
  2. Blend pineapples and mangoes to break them up, then add the banana.
  3. You may have to stop the blender and scoop the sides many times before everything comes together.

P1000733

There you go!

Quesadillas with Raw Vegan Saucy Salsa

24 Jul 14
admin
, , , , ,
2 comments

I seriously, seriously love these quesadillas.  When I first started going vegan, these were my go-to meals.  They are so delicious and very easy on the digestive system.  Cleanse-friendly!  For those who are having trouble weaning off dairy, I highly suggest these quesadillas.  It took a while for me to create a salsa I would like that would mimic the jarred salsas, and I think this one does the trick.


The quesadillas themselves are not raw vegan, but I do not cook the vegetables or the cheese I use in them and instead let them get heated up within the tortillas.  The salsa is raw vegan, however.  This entire recipe can be made gluten free by using the brown rice tortillas.


Quesadillas

Makes 6 servings.

Ingredients:

Now, I use a quesadilla maker to make my quesadillas.  It’s an inexpensive piece of equipment which saves me a lot of time and hassle, since it’s so easy to clean and I won’t have to worry about all my ingredients falling out of my tortillas when I flip them.

Here’s how to make it with the quesadilla maker:

Place one tortilla on quesadilla maker.  Add a couple tablespoons of shredded cheese, followed by a third of the vegetables, P1000771
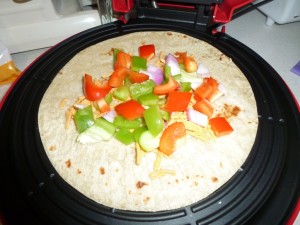
and then the rest of the third of the cheese.  P1000772Place another tortilla on top and press the quesadilla maker closed.

Alternatively, you would heat a large pan on medium high heat with a small amount of olive oil (or none if you prefer).  Assemble the quesadilla accordingly and then place on the pan, pressing down on the quesadilla until the bottom becomes a golden brown.  Flip and repeat the process for the other side.

Serve immediately, or wrap in aluminum foil and store for later.  To reheat, simply place the quesadilla on a sheet of foil and heat in a toaster oven.  I put it on Toast for Medium-Low.P1000773


Saucy Salsa


Makes about 8-10 cups.

Ingredients:

  1. First add the sundried tomatoes, dates, and garlic into the food processor or blender to break them up.
  2. Add the rest of the ingredients except for the tomatoes and onion and blend.
  3. Cut 2 tomatoes into quarters or however size that will allow them to fit and move around in your food processor or blender and blend.
  4. Add the last chopped tomato and onion and pulse until all ingredients are incorporated.

Hellooooooo Alfredo!

15 Jun 14
admin
, , ,
3 comments

Oh gosh, what can I say about this?  Of course, it’s super healthy and it’s vegan.  Of course, it’s delicious.  You’ll be getting your protein and fiber for sure!  And it’s SUPER easy!  Probably half an hour to make, which includes waiting for the pasta water to boil.  Normal alfredo is more complicated and there’s nothing in it that’s good for you!  I love this dish.  I really do.


I know eating clean can be intimidating and hard to stick with, so when I want to “indulge” in something fatty, this totally hits the spot!  So do yourself a favor and try out this recipe!


Makes 3-4 servings.


  1. Cook pasta according to directions.
  2. In a food processor or blender, blend cashews and water thoroughly.
  3. Add yeast, salt, oil, flour, lemon juice, powders, and coconut milk and blend.
  4. Drain pasta and return to pot.  Add sauce and remaining ingredients, and cook on low heat for 10-15 minutes until sauce thickens.

alfredoVoilá!

IMG_20140615_000640

Raw Vegan Raspberry Jam Bars

13 Jun 14
admin
, , , , , ,
one comments

I can’t think of many things better than guilt free, healthy dessert.  I mean, how can you go wrong with dessert that’s actually GOOD for you??  So I have a thing for raspberry jam.  These bars are basically bars with raspberry jam, topped with icing.  The awesome part is that they’re made with chia seeds, which are superb for your body and contain the essential omega fatty acids.  Plus, raspberry has lots of antioxidants and coconut water has electrolytes.  Then you got nuts for more protein and fiber…it’s crazy that dessert can do so much good to your body.  So definitely try out these raw vegan, gluten free bars.  Your body AND your taste buds will thank you!  Eating clean never tasted so good! So check out this awesome and easy recipe below.

Base Layer

Blend all ingredients and press onto a wax/parchment lined pan. Set in fridge to firm up.


Raspberry Jam Layer (can be made ahead of time; lasts 3-4 days in refrigerator or can be frozen)

  1. Blend water and dates until the dates have broken up.
  2. Add raspberries and chia seeds and pulse until it gets that chunky jam look.
  3. Place in a glass container and cover. Place in fridge for at least 30 minutes for the flavors to infuse and the chia seeds to thicken up the jam.
  4. To assemble, spread this on top of the base.


Topping

  • 1/3 cup dried coconut
  • 1/3 cup raw walnuts
  • pinch cinnamon
  • pinch sea salt

Pulse until crumbly. Sprinkle over the raspberry later. Optional to sprinkle a couple tablespoons of raw cacao nibs as well if you like dark chocolate.


Coconut Icing

Mix together. Drizzle at the top. Place your bars in the fridge to set.

Differences Between Juicers

08 Jun 14
admin
, , , , , , , , , , , , , , , , , ,
2 comments


What Juicer Should You Buy?


Choosing a juicer can be overwhelming.  Here is the lowdown, starting from the cheapest:

  • centrifugal
  • masticating and single gear
  • twin gear
  • cold presser

Centrifugal

Pros: fast, easy clean-up, inexpensive

Cons: destroys the nutrients, still leaves wet pulp, loud

Let me get into the cons, since the pros are self-explanatory.

  • destroys the nutrients – We all know fruits and vegetables aren’t shelf stable.  Pretty much anything we do to them jump starts the release and destruction of nutrients due to oxidation (exposure to the air).  Centrifugal juicers basically cut up these fruits and veggies and spin them around at a high speed so that some of the liquid gets separated from the fiber.  As a result, you have to drink the juices within 15 minutes of juicing.  So you can’t make any juice ahead of time and store them.
  • still leaves wet pulp – The drier the pulp, the more you’ve extracted out of the fruits and veggies and the more bang you’re getting for your buck.
  • loud – the world and its grandma is going to know you’re juicing whenever you are

Masticating and Single Gear

This is basically the in-between juicer.  I suggest this juicer to most people because it’s a nice balance between those who don’t want to spend too much on a juicer but still want quality juicers.

These juicers are gentle enough that you can make your juices ahead of time and store them.  Some say you can store up to 72 hours, but I’d just do 2 days max to be safe.

A couple reasonably priced juicers:


Twin Gear

Pros: produces juices with high nutrient value, quiet, leaves dry pulp

Cons: pricey, slow, tedious clean-up

Imagine pushing something through a pair of gears.  That something gets gently squeezed and, in this case, produces juices with a high level of nutrients intact and leaves behind dry pulp.  These juices can be stored up to 72 hours but I just keep them for 48 hours max, just in case.  These juicers come with many parts to clean up and take longer to juice, since it is so gentle on the fruits and veggies.

I have been using this one since 2012 and I still love it:


Cold Presser

This is the Rolls Royce of juicers.  The highest quality juices come from these machines.  Being as that I’m sure the large majority of us don’t have an exorbitant amount of money to roll around in, I’m not going to waste my breath on explaining these because they don’t come cheap.


TIP!!!!! When storing your juices, put them in tightly sealed, nonporous (ie, non-plastic) containers, like mason jars, leaving as little air as possible in the containers.

juice

Previous Detox Post – Juicing?

Next Detox Post – Oil Pulling


Juicing? Who What When Where Why

08 Jun 14
admin
, , , , , , , , , , , , , , , , , ,
No Comments

What is the big deal about juicing?  Here’s the 101.


First off, let me begin by explaining the 2 types of juicing that’s out – let me call them juicing for health and mainstream juicing.

  • Mainstream juicing – what is most likely being referred to out in the media now, that is currently become more and more popularly used for detoxification, and consists of juice fasts lasting for 3, 5, or 10 or more days.
  • Juicing for health – the juicing done by health aficionados who actually incorporate juicing into their daily lives.

I am not a fan of mainstream juicing.  Juicing actually has legitimate benefits but mainstream juicing is what is attracting those who want quick fixes and to have a fast detoxification and weight loss.  The problem with mainstream juicing is that people don’t realize how unhealthy and improper it is.  You can’t eat like crap and then shock your system with a juice fast, only to jump right back into crappy food.  It’s going to feel awful and any benefits to your body from the juice fast quickly goes to waste, literally and figuratively.  So I suggest if you want to go through a juice fast, start off by easing your body into it by eating clean first.  And DEFINITELY eat clean and light as you transition back into solid foods.


As for the juicing for health folks – we try to incorporate green juices into our everyday lives to supplement our diets.  Personally, I drink green juices every day for breakfast, when my stomach is empty, so that the nutrients can go directly into my body.


What the heck is juicing?

It’s simple – take a bunch of veggies, mostly green veggies, and a little bit of fruit, and drink them without the fiber.

Many argue that you need the fiber in your diet.  Here’s my argument: a healthy diet will have plenty of the fiber you need.  You’re not missing out by juicing.  By taking out the fiber, you are skipping the digestive process and allowing those nutrients to get to work on your body right away.  Green juices are basically a magical elixir that you add to your everyday diet.  They allow you to get an extra boost of veggies that you couldn’t possibly eat in a day.


Okay, so how do I do it?

Simple.  Buy a juicer.  Buy vegetables.  Put the two together.  I usually drink 16 ounces a day.

The proportion of veggies to fruit should be 3 to 1 because you don’t want to overload on the sugar.  Personally, I only use half an apple for every 16 ounces and rely on cucumbers and celery to mellow out the taste, due to their high water content.

The darker green your veggies are, the better.

I find that as long as I have the cucumbers, celery, and apple, I can mix and match on the rest of the veggies without much problem.  I like to include vegetables I don’t normally eat.  Unless you like the taste of mustard, though, you might want to take it easy mustard greens.  I learned that out the hard way.  Also include herbs – cilantro helps clear out heavy metals from your body and parsley helps detox your kidneys.  Lemons keep the nutrients fresher longer.


Does that help?  Questions are welcome and I will be sure to update this post based accordingly!


But does it really work?

Yes.  I am gaining nothing by telling you to start juicing, except the knowledge that I am helping you become a healthier person.

Juicing has helped me get stronger faster and heal faster.  It has cleared cobwebs from my mind and it has balanced out my chemical hormones.  I feel like a sane person now.  Or…saner.  And most importantly, it has helped my digestive system.  So now I can eat more without getting fat!  Woooooooo!!!!!!


Click here for help on what juicers to buy.


Next Detox Post – Differences Between Juicers

Southwestern Creamy Tomato Pasta

08 Jun 14
admin
, , , , , , , , , , , , , , , , , , , , , , , , , , , , ,
No Comments


I’m not usually a fan of Mexican/Texan food, but this vegan recipe is delicioso!  It has a slight kick to it, depending on how sensitive your taste buds are, but the combination of flavors makes this dish so amazing.  But all you need is a pot and a food processor or blender!  So very easy and yummy that you won’t believe it’ll actually help you detoxify and lose weight!

Makes 4 servings.


Ingredients:

Instructions:

  1. Boil pasta according to instructions.
  2. Add garlic cloves and lemon juice into blender/food processor to mince the garlic.
  3. Add drained sundried tomatoes to chop.
  4. Add drained cashews, spices, yeast, miso paste, and sea salt, then add coconut milk.
  5. Drain pasta and return to pot.  Add sauce and remaining ingredients and stir until everything is coated with the sauce.

southwest